Pythonアプリ教材難問解答例
目次
このドキュメントについて
難問についてのみ解答例を記述しておきます。なお、問題解決の方法は色々ありますので、色々な方法を知って学んで創り出してください。
カレンダーを作ろう
やってみよう4. 月を移動可能にしよう
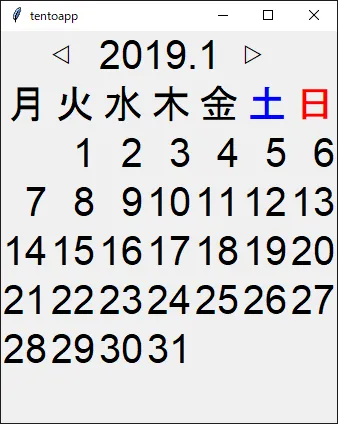
解答例1:日付のラベルをすべて配列cellsに入れておく方法
配列cellsの各要素cは、最初にgridでの表示位置を決められた( l.grid(col,row+2) のところで)、いわゆる表示枠です。この各表示枠に、日付のラベル(day)を c.text = day で割り当てていくイメージです。
from tentoapp import *from datetime import *import calendar
app= App()
now = datetime.now()current_year = now.yearcurrent_month = now.month
def update(year, month):    (first, last) = calendar.monthrange(year,month)    lym.text = str(year) + "." + str(month)    n = 0    day = 1    for c in cells:        c.text = ""        if first <= n and day <= last:            c.text = day            day += 1        n += 1
def next():    global current_year, current_month    current_month += 1    if current_month > 12:        current_year += 1        current_month = 1    update(current_year, current_month)
def previous():    global current_year, current_month    current_month -= 1    if current_month < 1:        current_year -= 1        current_month = 12    update(current_year, current_month)
lym = Label(app)lym.text = "2019.1"lym.fontsize = 30lym.grid(2,0)lym.colspan = 3
bl = Label(app)bl.text = "◁"bl.onclick = previousbl.fontsize = 30bl.grid(1,0)
br = Label(app)br.text = "▷"br.onclick = nextbr.fontsize = 30br.grid(5,0)
youbi = ["月", "火", "水", "木", "金", "土", "日"]col = 0for y in youbi:    l = Label(app)    l.fontsize = 30    l.text = y    l.grid(col, 1)    l.sticky = "e"    if col == 5:        l.color = "blue"    if col == 6:        l.color = "red"    col += 1
cells = []for row in range(6):    for col in range(7):        l = Label(app)        l.fontsize = 30        l.grid(col,row+2)        l.sticky = "e"        cells.append(l)
update(current_year,current_month)
app.start()
解答例2:配列を使わない方法 + 日曜日始まり
表示枠の配列cellsは使わずに、フラグ(startFlg)を使って日付の書き始めや書き終わりをコントロールしています。また、表示が日曜日始まりになるようにしています。
この方法は表示枠の配列cellsを使うのよりもわかりやすいかもしれませんが、updateのたびに日付表示用の新たなラベルオブジェクトを大量に生成しているので、メモリの無駄遣いをしているとも考えられます。
from tentoapp import *from datetime import *import calendar
def update(year, month):    global lym    (first, last) = calendar.monthrange(year,month) #月の初日の曜日(月曜が0、日曜が6)と、月の日数を取得    lym.text = str(year) + "." + str(month)    day = 1    #dayは1,2,3...の日付数字    youbi_nums = (6,0,1,2,3,4,5)    #日曜日始まり。(日曜,月曜,・・・,土曜)    startFlg = False    for row in range(6):        for col in range(7):            #曜日に合わせて初日(day=1)を書き始める。            ynum = youbi_nums[col]            if row == 0 and ynum == first :    #第1週でかつ初日の曜日(first)に相当する列に当たったら、日付記述をスタート                startFlg = True            #最終日になったら、記述をやめる            if day > last:                startFlg = False            #startFlgがTrueならl.textは日付数字にする。Falseなら空白にする。            l = Label(app)            l.fontsize = 30            l.text = "   "            if startFlg == True:                l.text = day                day += 1            #土日の日付の色を変える            if youbi[col] == "土":                l.color = "blue"            if youbi[col] == "日":                l.color = "red"            #l.text(日付数字または空白)を所定のセルに表示する            l.grid(col,row+2)            l.sticky = "e"    #文字は右寄せ
def next():    global current_year, current_month    current_month += 1    if current_month > 12:        current_year += 1        current_month = 1    update(current_year, current_month)
def previous():    global current_year, current_month    current_month -= 1    if current_month < 1:        current_year -= 1        current_month = 12    update(current_year, current_month)
app = App()
lym = Label(app)lym.fontsize = 30lym.grid(2,0)lym.colspan = 3
bl = Label(app)bl.text = "◁"bl.onclick = previousbl.fontsize = 30bl.grid(1,0)
br = Label(app)br.text = "▷"br.onclick = nextbr.fontsize = 30br.grid(5,0)
youbi = ["日","月", "火", "水", "木", "金", "土"]col = 0for y in youbi:    l = Label(app)    l.fontsize = 30    l.text = y    l.grid(col, 1)    l.sticky = "e"    if col == 6:        l.color = "blue"    if col == 0:        l.color = "red"    col += 1
now = datetime.now()current_year = now.yearcurrent_month = now.monthupdate(current_year, current_month)
app.start()
解答例3: calendar.monthcalendar() を使う方法 + 日曜日始まり
calenderライブラリの関数 monthcalendar() を使えば、1か月分の日付並びを2次元配列で取得することができます。また、関数 setfirstweekday() を使えば、任意の曜日始まりに変更することができます。
from tentoapp import *from datetime import *import calendar
def update(year, month): global lym lym.text = str(year) + "." + str(month) calendar.setfirstweekday(calendar.SUNDAY) #日曜日始まりにする #calendar.setfirstweekday(calendar.MONDAY) #月曜日始まりにする days = calendar.monthcalendar(year, month) #1か月分の日付並びを2次元配列で取得 #print(calendar.month(year,month)) #(参考)これだけでカレンダーをコンソールに表示することもできる for row in range(6): for col in range(7): l = Label(app) l.fontsize = 30 l.text = " " if row < len(days): day = days[row][col] if day != 0: l.text = day #土日の日付の色を変える if youbi[col] == "土": l.color = "blue" if youbi[col] == "日": l.color = "red" #l.text(日付数字または空白)を所定の位置に表示する l.grid(col,row+2) l.sticky = "e"
def next(): global current_year, current_month current_month += 1 if current_month > 12: current_year += 1 current_month = 1 update(current_year, current_month)
def previous(): global current_year, current_month current_month -= 1 if current_month < 1: current_year -= 1 current_month = 12 update(current_year, current_month)
app = App()
lym = Label(app)lym.fontsize = 30lym.grid(2,0)lym.colspan = 3
bl = Label(app)bl.text = "◁"bl.onclick = previousbl.fontsize = 30bl.grid(1,0)
br = Label(app)br.text = "▷"br.onclick = nextbr.fontsize = 30br.grid(5,0)
youbi = ["日","月", "火", "水", "木", "金", "土"] #日曜日始まり#youbi = ["月", "火", "水", "木", "金", "土","日"] #月曜日始まりfor col in range(7): l = Label(app) l.fontsize = 30 l.text = youbi[col] if youbi[col] == "土": l.color = "blue" if youbi[col] == "日": l.color = "red" l.grid(col, 1) l.sticky = "e"
now = datetime.now()current_year = now.yearcurrent_month = now.monthupdate(current_year, current_month)
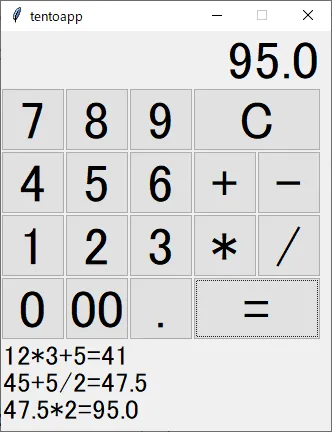
app.start()電卓を作ろう
やってみよう4. 計算の結果が残るようにしよう.
from tentoapp import *
def btnclick(e):    global start_flg, le    text = e.widget.text    #leに結果が表示された後、クリアボタンを押さずにそのまま計算を続行できるようにするための工夫    if start_flg == True and text in nums:  #最初でかつ数字入力なら、前の結果は消す。そうでなければ、そのまま入力した文字(+-*/)を追加する        le.text = ""  #わざわざこうするのは、例えば"01+2"はeval()でエラーになるため。    start_flg = False    le.text += text
def beqclick():    global le, results, start_flg, lr    shiki = le.text    le.text = str(eval(le.text))    results.append(shiki + "=" + le.text + "\n")    start_flg = True    if len(results) > 3:        del results[0]    lr.text = ""    for r in results:        lr.text += r
def cclick():    global le, start_flg    le.text = "0"    start_flg = True
app = App()app.size(330,400)
le = Label(app)le.text = "0"le.grid(0,0)le.colspan = 5le.fontsize = 40le.sticky = "e"
nums =  ["7","8","9","4","5","6","1","2","3","0","00","."]for i in range(12):    b = Button(app)    b.text = str(nums[i])    col = i % 3    row = i // 3 + 1    b.onclick = btnclick    b.grid(col, row)    b.fontsize = 40    b.width = 2
kigou = ["+","-","*","/"]for i in range(4):    b = Button(app)    b.text = kigou[i]    col = i % 2 +3    row = i // 2 + 2    b.onclick = btnclick    b.grid(col, row)    b.fontsize = 40    b.width = 2    row += 1
c = Button(app)c.text = "C"c.onclick = cclickc.fontsize = 40c.width = 2c.colspan = 2c.grid(3,1)c.sticky = "we"   #"we"で、グリッドの左(w)右(e)いっぱいに配置される
beq = Button(app)beq.text = "="beq.onclick = beqclickbeq.fontsize = 40beq.width = 2beq.colspan = 2beq.grid(3,4)beq.sticky = "we"
results = []lr = Label(app)lr.text = resultslr.grid(0,5)lr.colspan = 5lr.fontsize = 20lr.sticky = "w"
start_flg = True
app.start()